
Mastering the Saint Honoré: A Classic French Pastry Masterclass
The Saint Honoré is a true icon of French patisserie, a delightful symphony of textures and flavours that’s sure to impress. It combines the airy lightness of choux pastry, the silken richness of Chiboust cream, and the sweet crunch of caramel, creating an indulgent finale to any meal. While it may seem daunting, this guide will break down the process, step-by-step, empowering you to recreate this magnificent dessert in your own kitchen. We’ll cover everything from the foundational choux pastry and luscious pastry cream to the delicate Italian meringue and glistening caramel. Get ready to become your own patisserie chef!
Ingredients You’ll Need
To embark on this delicious journey, gather the following ingredients:
For the Choux Pastry Base:
- 1 sheet of puff pastry
For the Choux Buns:
- 1 cup (240ml) water
- 1/3 cup (75g) unsalted butter
- 1 teaspoon salt
- 1 ¼ cups (160g) plain flour
- 4 large eggs
- 1 egg, beaten (for glazing)
For the Chiboust Cream:
- 2 cups (480ml) milk
- 1 vanilla bean, split and scraped
- 4 large egg yolks
- 1/3 cup (65g) caster sugar
- 1/3 cup (40g) cornflour (cornstarch)
- 6 sheets gelatin, softened in cold water
- 5 large egg whites
- 1 cup (200g) caster sugar
- 2 fl oz (60ml) water
For the Caramel:
- 1 ¼ cups (250g) caster sugar
- 1/4 cup (60ml) water
- 2 oz (55g) glucose syrup
Essential Equipment
Having the right tools can make all the difference:
- Thermometer: Crucial for achieving precise syrup temperatures.
- Piping Bags: For neat and controlled filling and decoration.
- Fine Nozzle: For filling the choux buns.
- Saint Honoré Nozzle: Specifically designed for decorative swirls.
- Silicone Mat: Prevents sticking and ensures easy removal.
Step-by-Step Preparation
Let’s get baking! Follow these steps carefully to create your masterpiece.
Part 1: Crafting the Choux Pastry

Step 1: The Dough Base
Begin by preparing the choux pastry. In a saucepan, combine the water, butter, and salt. Heat over medium heat until the butter has completely melted. Once melted, add the flour all at once. Stir vigorously with a wooden spoon until the mixture forms a cohesive ball that pulls away cleanly from the sides of the saucepan.

Step 2: Incorporating the Eggs
Remove the saucepan from the heat. Allow the dough to cool slightly for a minute or two. Then, add the eggs one by one, mixing thoroughly after each addition. It’s essential to mix vigorously at this stage, as this process develops the elasticity of the dough, which is key to achieving light and airy choux.

Step 3: Piping and Baking the Choux Buns
Preheat your oven to 350°F (180°C). Spoon the choux pastry into a piping bag fitted with a round nozzle. Pipe 18 small, evenly sized mounds onto a baking tray lined with a silicone mat or baking paper. Brush the tops of the choux buns with the beaten egg for a golden finish. Bake for approximately 20 minutes, or until puffed up and golden brown. Crucially, do not remove them directly from the oven. To prevent them from deflating, leave the oven door slightly ajar for about 10 minutes before taking them out to cool completely.
Part 2: Assembling the Pastry Base

Step 4: The Puff Pastry Foundation
Unroll your puff pastry sheet. Using a sharp knife or pastry cutter, create a circular base. Then, arrange the cooled choux buns around the outer edge of the puff pastry circle, leaving a small margin of about 0.2 inches (0.5 cm) to allow the puff pastry to expand. Next, create a spiral pattern with the remaining choux buns in the centre of the puff pastry base. Bake this assembled base for about 30 minutes at 350°F (180°C), using the same method of leaving the oven door ajar at the end of baking to prevent deflation.
Part 3: Creating the Luxurious Chiboust Cream

Step 5: Preparing the Pastry Cream Base
Begin by softening the gelatin sheets in a bowl of cold water. In a separate saucepan, heat the milk with the split vanilla bean until it just reaches a boil.

Step 6: Whisking and Tempering
While the milk is heating, in a heatproof bowl, whisk together the egg yolks and caster sugar until the mixture becomes pale, thick, and creamy. Gradually whisk in the cornflour until well combined. Slowly and carefully pour the hot milk into the egg yolk mixture, whisking continuously to temper the eggs and prevent them from scrambling.

Step 7: Thickening the Cream
Return the entire mixture to the saucepan. Cook over medium heat, stirring constantly, until the pastry cream thickens to a smooth, custard-like consistency.
Step 8: Incorporating Gelatin and Cooling
Remove the thickened cream from the heat. Squeeze out any excess water from the softened gelatin sheets and add them to the warm cream. Stir well until the gelatin is completely dissolved. To prevent a skin from forming, cover the surface of the cream directly with plastic wrap (ensure the wrap touches the cream). Set aside to cool.
Part 4: The Italian Meringue

Step 9: Heating the Sugar Syrup
In a clean saucepan, combine the caster sugar and water for the meringue. Place over medium heat and bring to a boil. Once boiling, insert your thermometer. The syrup needs to reach precisely 240°F (115°C).

Step 10: Whipping the Egg Whites
While the sugar syrup is heating, begin whisking the egg whites in a clean, grease-free bowl. Continue whisking until they reach a soft, foamy stage. Once the sugar syrup reaches 240°F (115°C), carefully and slowly pour it in a thin, steady stream into the foaming egg whites while the mixer is still running.

Step 11: Achieving Stable Meringue
Continue to beat the meringue on high speed. The meringue is ready when it is glossy, firm, and the exterior of the bowl feels cool to the touch. This process typically takes about ten minutes.
Part 5: Combining and Filling

Step 12: Creating the Chiboust Cream
In a large, clean bowl, place the slightly warm pastry cream. Gently fold in the Italian meringue. Mix carefully until you achieve a smooth, homogenous, and airy cream. This Chiboust cream needs to be used relatively quickly to prevent the gelatin from setting prematurely.

Step 13: Filling the Choux Buns
Using the tip of a small knife, carefully pierce small holes in the base of each cooled choux bun. Fill them generously with the prepared Chiboust cream using a piping bag fitted with a fine nozzle. Once filled, refrigerate the choux buns to allow the cream to set slightly.
Part 6: The Caramel Glaze and Decoration

Step 14: Making the Caramel
In a saucepan, combine the caster sugar, water, and glucose syrup. Place over medium heat and bring to a boil without stirring. Once the mixture begins to turn a light amber colour, remove it from the heat.

Step 15: Dipping the Choux Buns
Be extremely cautious when working with hot caramel. To safely dip the choux buns, place the saucepan containing the caramel into a larger bowl filled with hot water. This helps to keep the caramel liquid and manageable. Quickly dip the tops of the filled choux buns into the caramel. Place them, caramel-side down, onto a silicone mat or an oiled baking tray.

Step 16: Reheating and Attaching
If the caramel hardens too much, gently reheat the saucepan (in the hot water bath) to liquefy it again, being careful not to overcook it. Carefully detach the caramel-dipped choux buns from the tray. Then, dip their caramel-coated bases into the still-liquid caramel.

Step 17: Building the Ring
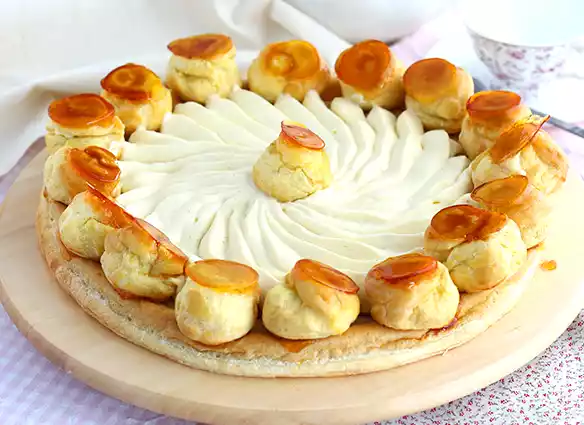
Immediately and carefully, press the caramel-dipped choux buns onto the edge of your assembled puff pastry and choux base. The caramel will act as glue, holding them in place. Continue this process, working your way around the entire circumference of the base, to create a beautiful, complete ring of choux buns. You should have one choux bun left over for later.

Step 18: Decorative Swirls
Fill a clean piping bag fitted with a Saint Honoré nozzle with the remaining Chiboust cream. Starting from the outside edge of the pastry and working inwards, pipe elegant, swirled patterns over the choux and pastry base.

Step 19: The Centrepiece and Setting
Place the final reserved choux bun in the very centre of the Saint Honoré. Once decorated, refrigerate the entire dessert for at least 1 hour to allow the gelatin in the Chiboust cream to fully set, ensuring the structure holds.

Step 20: Your Saint Honoré is Ready!
And there you have it – your spectacular, homemade Saint Honoré is ready to be admired and devoured!
You Might Also Enjoy:
- Duchess Potatoes: A Step-by-Step Guide
- The Art of French Croissants: Explained
- Guacamole Express: Quick and Easy Preparation


